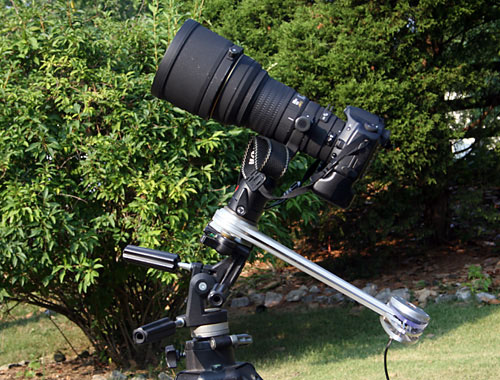

The AstroTrac TT320 is a single axis tracking mount that folds down for easy storage.
The TT320 is a self contained unit that folds down on itself for ease of setup and teardown.
AstroTrac TT320 Single-Axis Mount
|
|
|
|
The AstroTrac TT320 The AstroTrac TT320 is a single axis tracking mount that folds down for easy storage. |
The TT320 view from below The TT320 is a self contained unit that folds down on itself for ease of setup and teardown. |
I was looking forward to NEAF 2007 in Suffern NY. I try to go as often as I can, for the great speakers, for the people I have met there and become friends with, and for the enormous amount of cool gear. This year was no different. There was quite a bit of buzz at NEAF 2007, including the introduction of the TeleVue Ethos 13MM eyepiece. One place that also always seemed to have a crowd of people around was the Kendrick Astro Instruments booth. It was there that I caught my first glimpse of the AstroTrac TT320 tracking mount. I am all about photography, and a good astrophotography mount is worth its weight in gold. An easy-to-use and lightweight astrophotography mount is worth its weight in platinum. I had seen the TT320 in ads before NEAF, but this was my first chance to actually see it in operation. After talking to Richard Taylor from AstroTrac, and Jim Kendrick, I put my money down for one of the production units.
In the months following NEAF, I kept in touch with Jim about the release of the TT320. He agreed to get me one of the first production models in the states for me to review on this website. I promised him that I would put it through its paces and give an honest review. The concept of the TT320 was simple, and seemed to make a great deal of sense. However, I had some questions about how well the mount would perform for me, given the weight of some of my gear. I planned to test the unit as I planned to use it in the future. It would get a workout for this review.
The unit finally arrived, after I received notice that it had shipped from Kendrick Astro Instruments. When the package was delivered, I thought it was another piece of equipment I was expecting, and not the TT320. It was a small, light, thin package. I thought it was too small to be the mount. I opened the box to find the TT320, Power cord, Instructions, and the optional finder scope I had ordered, all in this small box. I was stunned, yet elated by the compact nature of the mount. I could take this almost anywhere with no problems. I was ready to check it out.
I had an extra Manfrotto 488 Ball Head lying around the house, so it got assigned to the TT320. I decided I would use my Bogen 3051 tripod legs and a Bogen 3047 3-way head to support the TT320. The top bolt for the head you are going to use to mount your camera or telescope to the TT320 is a 3/8" 16TPI mount. Most tripod heads have this thread inset in their base, so you can use most any tripod head with this mount to mount your camera.. However, the threaded inset on the bottom of the mount is also 3/8" 16TPI, so if you are planning to put this mount on top of another head, you will either need a mounting plate for your head that has a 3/8" mounting bolt, or a 3/8" 16TPI to 1/4 20TPI reducer so you can use the standard 1/4" 20 threaded mounting bolt.
I was not expecting the 3/8" 16TPI inset on the bottom of the mount, so I had to go out and buy a mounting plate for the 3047 head that had the 3/8" mounting bolt. However, the 488 head screwed right down on top of the TT320 with no problem. Now that I had what I needed to shoot with the new mount, I needed a clear night. That was not coming to my area for a few days, so I started testing the mount indoors.
The Testing
I brought in a 12 volt jumpstart power supply from my Astronomy Mobile Outreach Vehicle, and hooked up the TT320 to power. I had already read the short, two page manual to learn what the buttons were, and how to set the mount. The first thing I wanted to know was how long it would track. The advertisements say two hours of tracking. I rotated the tracking arm for the northern hemisphere, hit the button to let the mount position the arms to start tracking, and then started timing the mount when I hit the button to start the tracking. The polycarbonate drive screw cover flashes a green glow to let you know that the mount is tracking. It isn't much of a problem, but I wish it would flash in red light, instead of green. I am sure that some fellow astronomer will say something to me about the flashing green light on the TT320. The mount is nearly dead silent during tracking, and emits a minimal, high-pitched whir when positioning to track, or rewinding the tracking arm at the end of its travel. As the tracking arm neared the end of the tracking worm, it started beeping as a warning that it would soon run out of worm gear. You can rewind the mount at any time by pressing the rewind button. By the way, this is a very fine work gear. I have not encountered any problems with debris on the gear, but I would imagine that you will want to keep this threaded rod clean of dirt and contaminants. There is nothing about keeping the rod clean in the instructions, so I guess. The instructions say that the motor might stall if debris clogs the drive screw, but it says nothing at all about how to clear the clog, or maintenance to prevent such a problem. I guess I may find out soon enough.
The mount went into a steady beep as it ran out of travel. It does not automatically rewind, so you have to be an active user of this mount. It tracked for 1 hour, 49 minutes, and 15 seconds. I tested the mount time duration for the southern hemisphere, and again for the northern hemisphere. Same results... exactly. So, my mount does not track for 2 hours, but I do not find that much of a big deal The mount has a button to control the loudness of the beeping, and the brightness of the LEDs. I have both of mine set at max. I am used to using Meade LX200 Classics, so I guess I don't mind a little noise while observing.
The skies finally cleared out for me to get a night out with the new mount. I went to my regular observing site and set up the mount. It went together easily and quickly. I put the polar scope in the holder to do a polar alignment. I had to hold the flange of the polar scope against the polar scope holder while I rotated the scope to line up the stars for the polar alignment. Then I would lock the scope in place while I made adjustments to the mount. Then I would be back to the polar scope, unlocking the scope to made adjustments and then locking it in place to readjust the mount. I am not sure if I was missing a piece, or if it is the way the polar scope is designed, but it sure would help if there was some kind of ring on the polar scope that would allow me to turn the polar scope without having to manually hold it in the polar scope arm. The polar scope is well designed for quick and accurate polar alignment, with the Big Dipper (Ursa Major) and the Big W (Cassiopeia) printed for the northern hemisphere, and Crux printed for the southern hemisphere. For the northern hemisphere, you turn the polar scope to roughly align Ursa Major and Cassiopeia in the scope. Then you place Polaris in a open area, marked for Polaris, and then you align a dimmer second star in the opening marked, next to the circle for Alpha Eridani, and you are polar aligned. It is a very easy polar scope to use.
 |
 |
|
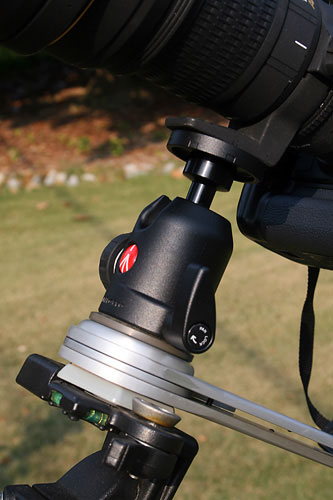
The AstroTrac TT320 Camera Head Position The AstroTrac TT320 positions the head that will be carrying the camera or telescope over the pivot point of the mount. This design gives the TT320 an advantage over other mounts that require balancing of the axis arm. It also allows the use of more sturdy Ball Heads to handle heavier equipment. |
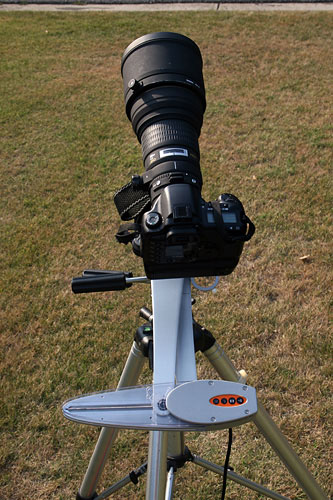
The TT320 view from above The TT320 is sturdy enough to handle large lenses, as seen in this image. |
I proceeded to shoot images over a series of evenings, trying to find weaknesses in the mount. I shot with a variety of lenses on my modded 350D, my 30D, 20D, and 10D's. I shot with my 300mm f2.8 with 2x teleconverter. I shot with Olympus wide angle lenses. The TT320 took it all in stride. I shot short exposures of 2 minutes. I shot long exposures of 10 and 15 minutes. Although some showed some trailing, it was mainly due to polar alignment issues on my part. When I took the time to properly polar align the mount, it work as advertised. As you could probably guess, if you are going to use a longer focal length, your polar alignment must be more accurate. However, even if you are shooting wides, an accurate polar alignment is something that will pay you back many times over, given the accuracy of this mount. I have over 30 hours of imaging already with this mount, and every time I use it, it gets better. I am pretty sure that it is the fact that I am getting used to the mount, and getting better at polar aligning it. Regardless, I keep getting better images, and that is what it is all about.
In one of my last tests before writing this review, I used a Canon 17-55mm lens, set to 17mm, on my Canon 30D for a series of photos. I chose the Cygnus area for this test. I would shoot a series of 5 minute exposures over most of the travel of the mount. They would be in a series of three 5 minute exposures, with a few minutes of break time in between each series. I wanted to check for drift over the full range of the mount arms travel. I ended up taking fifteen 5 minute images, for a total of 75 minutes of data, over a period of one hour and thirty five minutes. When I imported the images into Images Plus for processing, the stars barely moved in the frames over that entire period. The only other mount that I own that will do that for me is my Mountain Instruments MI-250, and it costs many thousands of dollars more than the TT320. Of course, the MI-250 will also carry five times the capacity of the TT320.
Am I comparing the TT320 to the MI-250? Of course not. They are completely different kinds of mounts. However, the TT320 does have the incredible tracking accuracy that you expect out of high dollar equatorial mounts, without the weight or setup complexities. The TT320 has its place, but it has grabbed its place, and it is holding on tight.
 |
 |
|
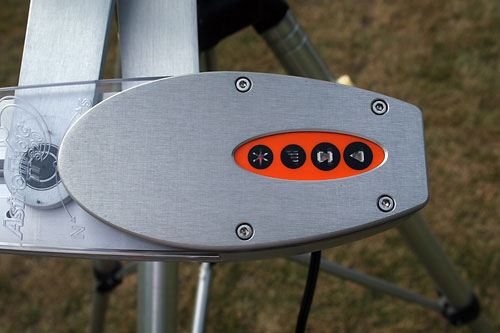
The TT320 Control Panel The TT320 Control Panel has 4 buttons. They are, from left to right, the LED Brightness Control, the Audio Beeper Level Control, the Rewind Button, and the Start Button. |
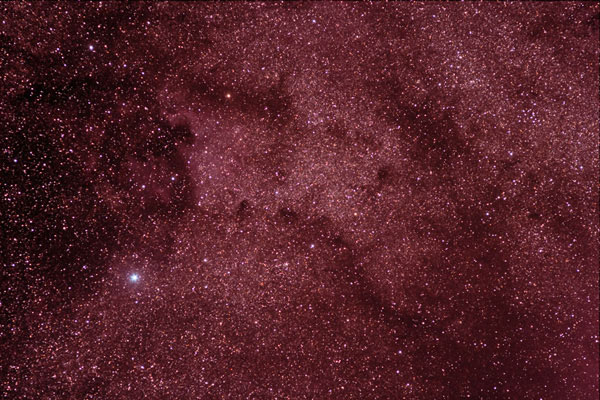
Cygnus Area
Imaged with the TT320 The TT320 guided my Canon 30D for 15 five minute exposures over a period of 1 Hour and 35 Minutes for this image of the Cygnus area of the Milky Way. There was almost no movement whatsoever between exposures. |
 |
 |
| Cygnus Area w/
the TT320 The TT320 controlled the motion of the earth in this image. Shot with an unmodified Canon 30D and a Olympus 200MM f4 lens. 10 three minute exposures - 30 minutes total. |
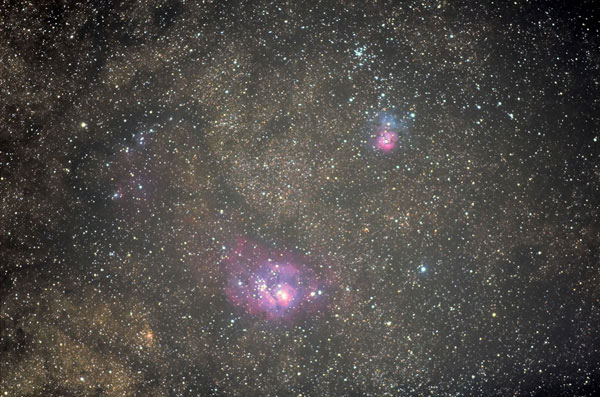
M8 and M20
Imaged with the TT320 I used the TT320 to guide my Canon 30D for 5 two minute exposures for this image of the nebulae in Sagittarius. I was using a 300mm f2.8 lens wide open at ISO1600. |
Issues?
Does the TT320 have any issues? Yes, however it is the same issue that every mount has to deal with. You must use a sturdy tripod when you use this mount. I had first thought that the TT320 had a problem with the wind and the rotating worm assembly acting as a wing, causing vibrations. It turns out that it was really the tripod that I was using that was insufficient to hold the TT320 securely. I mounted the TT320 to a heavier tripod and head, and all of my vibration issues disappeared. So, when you buy this mount, make sure you use a heavy duty tripod for best results, especially at longer focal lengths, and if there is any wind while you are imaging.
Also, the Polar Scope arm has a small, nylon screw that holds the polar scope in place. Mine is already bent, and it will probably break soon. I am guessing that you would be able to get a replacement from AstroTrac, but a metal thumbscrew would hold up a bit better. It is a minor issue, but it could easily ruin your day if it broke while you were aligning for the evening. I have been informed that the AstroTrac TT320 has been updated and the polar scope uses a magnetic ring instead of the nylon screw to hold the polar alignment scope in place. I am sure that this new system works much better. (I have been notified that AstroTrac has taken care of this issue)
Final Assessment
So, what do I think of the AstroTrac TT320? Well, if you want mine, you are going to have a fight on your hands.
I love this mount. It works great, it is lightweight and compact. It is sturdy, and extremely well designed. Setup takes very little time at all. You simply set whatever camera and lens combination, or telescope, on the mount, making sure that it does not exceed the max carry weight of the TT320 (20 lbs.) or the head that you are using. Very simple, yet very effective. There are no issues with counterbalancing. Let me repeat that...... No issues with counterbalancing!!!!!! Once I was set up, I could concentrate completely on my photography. I could change lenses without worry because, once again, there are no issues with counterbalancing!!!!!!! I have a large array of lenses for my DSLR's, and being able to swap focal lengths at will is an enormous help to me. The TT320 is not inexpensive, but I feel it is well worth the money that I paid for it. Also, you must take into consideration that along with the cost of the TT320, you will also have to buy a strong ball head to mount your camera to the TT320, and you are also going to need a strong tripod and head onto which you will mount the TT320. This will raise the cost of putting the TT320 to use for your astrophotography, unless you already own the tripod and heads necessary to use this mount.
AstroTrac has been very responsive to my review of their product, as well as the issues I have raised. They are updating their manual, and making the mount better. This speaks volumes about this company. I appears that they are willing to contimue to make their product as good as it can be. It is great already. The possibilities are endless.
If you are in need of a highly accurate, easily transportable mount for your astrophotography, or your observing, you cannot go wrong with the AstroTrac TT320. I highly recommend the AstroTrac TT320 system to anyone who needs an accurate, compact, and decently priced mount. You got to get one. It's great.
You can get the AstroTrac TT320 System at AstroTrac .
Mike Overacker